
티스토리 뷰
11.3 Promises chaining
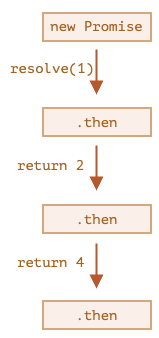
프라미스는 주로 체이닝을 해서 사용한다. 아래와 같이 말이다. 프라미스의 .then은 프라미스를 반환한다. 따라서 체이닝이 가능하다. 이 때 반환되는 result 값이 다음 then으로 전달 되므로 결과도 그에 맞게 반환된다.
new Promise(function(resolve, reject) {

  setTimeout(() => resolve(1), 1000); // (*)

}).then(function(result) { // (**)

  alert(result); // 1
  return result * 2;

}).then(function(result) { // (***)

  alert(result); // 2
  return result * 2;

}).then(function(result) {

  alert(result); // 4
  return result * 2;

});
위 예시와 아래 예시는 분명히 다르다. 아래 예시는 여러개의 then을 호출한 것이지 체이닝이 아니다.
let promise = new Promise(function(resolve, reject) {
  setTimeout(() => resolve(1), 1000);
});

promise.then(function(result) {
  alert(result); // 1
  return result * 2;
});

promise.then(function(result) {
  alert(result); // 1
  return result * 2;
});

promise.then(function(result) {
  alert(result); // 1
  return result * 2;
});
Returning promises
프라미스 체이닝 중에 새로운 프라미스를 반환할 수도 있다.
new Promise(function(resolve, reject) {

  setTimeout(() => resolve(1), 1000);

}).then(function(result) {

  alert(result); // 1

  return new Promise((resolve, reject) => { // (*)
    setTimeout(() => resolve(result * 2), 1000);
  });

}).then(function(result) { // (**)

  alert(result); // 2

  return new Promise((resolve, reject) => {
    setTimeout(() => resolve(result * 2), 1000);
  });

}).then(function(result) {

  alert(result); // 4

});
위 코드를 보면 처음 에시와는 다르게 두번째, 세번째 프라미스가 반환될때, 1초의 딜레이가 발생하게 되어 있다.
Example: loadScript
이전 챕터에서 정의한 loadScript 예시를 다시보자.
loadScript("/article/promise-chaining/one.js")
  .then(function(script) {
    return loadScript("/article/promise-chaining/two.js");
  })
  .then(function(script) {
    return loadScript("/article/promise-chaining/three.js");
  })
  .then(function(script) {
    // 불러온 스크립트 안에 정의된 함수를 호출해
    // 실제로 스크립트들이 정상적으로 로드되었는지 확인합니다.
    one();
    two();
    three();
  });
화살표 함수를 통해 코드를 좀 더 간결하게 할 수도 있겠다.
loadScript("/article/promise-chaining/one.js")
  .then(script => loadScript("/article/promise-chaining/two.js"))
  .then(script => loadScript("/article/promise-chaining/three.js"))
  .then(script => {
    // 스크립트를 정상적으로 불러왔기 때문에 스크립트 내의 함수를 호출할 수 있습니다.
    one();
    two();
    three();
  });
thenable
핸들러는 프라미스가 아닌 thenable이라 불리는 객체를 반환하기도 한다. .then이 가능한 객체는 모두 thenable 객체라 하고, 객체도 프라미스와 같은 방식으로 처리된다.
class Thenable {
  constructor(num) {
    this.num = num;
  }
  then(resolve, reject) {
    alert(resolve); // function() { 네이티브 코드 }
    // 1초 후 this.num*2와 함께 이행됨
    setTimeout(() => resolve(this.num * 2), 1000); // (**)
  }
}

new Promise(resolve => resolve(1))
  .then(result => {
    return new Thenable(result); // (*)
  })
  .then(alert); // 1000밀리 초 후 2를 보여줌
이러한 객체를 이용해 Promise를 상속받지 않고도 체이닝을 사용할 수 있다.
Bigger example: fetch
비동기 동작은 항상 프라미스를 반환하도록하는 것이 좋다. 아래 예시를 주의깊게 살펴보자.
// user.json에 요청을 보냅니다.
fetch('/article/promise-chaining/user.json')
  // 응답받은 내용을 json으로 불러옵니다.
  .then(response => response.json())
  // GitHub에 요청을 보냅니다.
  .then(user => fetch(`https://api.github.com/users/${user.name}`))
  // 응답받은 내용을 json 형태로 불러옵니다.
  .then(response => response.json())
  // 3초간 아바타 이미지(githubUser.avatar_url)를 보여줍니다.
  .then(githubUser => {
    let img = document.createElement('img');
    img.src = githubUser.avatar_url;
    img.className = "promise-avatar-example";
    document.body.append(img);

    setTimeout(() => img.remove(), 3000); // (*)
  });
(*)줄에서 img.remoce() 후 뭔가 또 다른 작업을 하고 싶으면 어떻게 해야할까?
fetch('/article/promise-chaining/user.json')
  .then(response => response.json())
  .then(user => fetch(`https://api.github.com/users/${user.name}`))
  .then(response => response.json())
  .then(githubUser => new Promise(function(resolve, reject) { // (*)
    let img = document.createElement('img');
    img.src = githubUser.avatar_url;
    img.className = "promise-avatar-example";
    document.body.append(img);

    setTimeout(() => {
      img.remove();
      resolve(githubUser); // (**)
    }, 3000);
  }))
  // 3초 후 동작함
  .then(githubUser => alert(`${githubUser.name}의 이미지를 성공적으로 출력하였습니다.`));
setTimeout에서 resolve했을 때 처리되는 새로운 프라미스를 반환하는 것이다. 이렇게 다음 체이닝으로 넘어가서 또다른 동작을 수행할 수 있다. 좀 더 간결해진 예시
function loadJson(url) {
  return fetch(url)
    .then(response => response.json());
}

function loadGithubUser(name) {
  return fetch(`https://api.github.com/users/${name}`)
    .then(response => response.json());
}

function showAvatar(githubUser) {
  return new Promise(function(resolve, reject) {
    let img = document.createElement('img');
    img.src = githubUser.avatar_url;
    img.className = "promise-avatar-example";
    document.body.append(img);

    setTimeout(() => {
      img.remove();
      resolve(githubUser);
    }, 3000);
  });
}

// 함수를 이용하여 다시 동일 작업 수행
loadJson('/article/promise-chaining/user.json')
  .then(user => loadGithubUser(user.name))
  .then(showAvatar)
  .then(githubUser => alert(`Finished showing ${githubUser.name}`));
  // ...
그런데 어차피 then을 하면 프라미스가 반환되는 것 아닌가? 헷갈린다... 추가적으로 더 살펴봐야겠다.
'스터디 > JavaScript' 카테고리의 다른 글
| 모던 자바스크립트 튜토리얼 part1 - 11.5 (0) | 2024.05.27 |
|---|---|
| 모던 자바스크립트 튜토리얼 part1 - 11.4 (0) | 2024.05.27 |
| 모던 자바스크립트 튜토리얼 part1 - 11.2 (0) | 2024.05.27 |
| 모던 자바스크립트 튜토리얼 part1 - 11.1 (0) | 2024.05.27 |
| 모던 자바스크립트 튜토리얼 part1 - 10.2 (0) | 2024.05.27 |